Showing posts with label recipe. Show all posts

Sunday, September 20, 2015

Recipe: Flourless chocolate, hazelnut ricotta cake


If you have a food intolerance, life can get a bit boring food wise. It isn't just that you are limited in what you can have, it is that people get good at making one thing that meets your needs and you get to have it over and over and over.

I'm lucky enough not to have any real food issues but I seem to be surrounded by people with them. At a recent dinner 11 of the 14 people there had special dietary requirements. So while I can eat everything, I do spend quite a bit of time thinking about new and delicious things I can make for my friends who have limitations.

When it comes to gluten free baking I started, like everyone it seems, with a flourless orange and poppyseed cake. Now there is nothing wrong with orange and poppyseed cake, mine is actually pretty damn delicious, but I realised that more often that not it is the only gluten free option in cafes and so my friends had it a lot. Since then I've been experimenting with a range of flavours and particularly with different nuts to replace the seemingly ubiquitous almonds.

This cake is great. Rich, moist, packed with flavour. You certainly don't feel like you are missing out on anything with it and I'm yet to meet anyone who doesn't love it. It is best the day after it has been made after it has spent a night in the refrigerator really developing that dessert like texture.


I've got two options for toppings with this recipe because S and I can't decide which is best. Topping one involves sprinkling grated chocolate over the top of the cake as soon as it comes out of the oven. It melts and forms a super chocolate layer. However it isn't that aesthetically pleasing.

Topping two is a simple dusting of icing sugar before serving which looks great but doesn't add a lot to the flavour.

Tips: Place a bowl of hot water in the bottom of the oven to add some moisture. This helps prevent cracks, although mine does often crack a little. If you don't like orange you can leave the zest out but it does add a lovely complexity to the flavour. When you take it out of the oven it will slowly drop in size, but that is what creates the great texture so don't worry when it happens.


Enjoy!

Flourless chocolate, hazelnut ricotta cake
120g butter
250g caster sugar (divided into 150g and 100g)
1 tsp vanilla paste
zest 1/2 an orange
4 eggs separated
45g cocoa
1/3 warm milk
240g hazelnut meal
300g ricotta
flaked almonds
either 20g grated dark chocolate or icing sugar to decorate

Preheat a fan forced oven to 160oC. Grease and line a 20cm baking tin.

Cream the butter, 150g of the sugar, vanilla and zest till light and fluffy. Add the egg yolks one at a time, scraping down the sides of the bowl between additions.

In a small bowl, mix together the cocoa and milk to form a thick paste. Add to the butter mixture (note make sure your milk is only warm as it will help dissolve the cocoa but not too hot so that it melts the butter).

Add the hazelnut meal and mix well, then fold through the ricotta until all combined.

In a separate bowl beat the egg whites until soft peaks form, then beat in the remaining 100g of caster sugar until thick, glossy and hard peaks.

Fold the egg whites through the cake batter a third at a time. I do this by hand with a spatula carefully lifting and folding the mix so that you don't knock too much air out of the egg white.

Pour into the prepared tin, sprinkle the flaked almonds over the top and bake for 40-45 minutes until springy to touch. It may still look slightly wobbly in the tin but if the centre bounces back at the touch it is ready.

If you are using the chocolate, sprinkle over straight away so that it melts on the hot cake.

Allow to cool completely in its tin before transferring to a plate. Cover with plastic wrap and refrigerate over night.

Serve cold from the fridge, dusted with icing sugar of using that option and with a good dollop of whipped cream.

Saturday, August 8, 2015

Recipe: Winter salad with roast garlic dressing


My stomach (or my mouth really) can be a contrary thing, always craving what is not in the house or is out of season, so it was no surprise really that in the middle of a cold winter day, my contrary stomach decided it really wanted salad. Not really winter food but much as I love soup, stews, curries and other comfort food, there comes a time when you just need a salad. I'm pretty sure the last couple of weeks of indulgent eating may have had something to do with the need for greens.

However, winter does not make for the best salad ingredients and despite the salad craving I still wanted something warm, so a roast veggie salad seemed the way to go and I topped it with some chicken for a protein hit but this would be equally good minus the chicken as a side for a steak or even a roast.


A warm salad is a great dinner. Warming, filling but healthy. And while winter may not be a great time for salad veggies like tomato, many lettuces like it. My backyard rocket patch has gone crazy allowing for a great green base.

When thinking of a dressing to accompany the richness of all those roast veggies, a garlic vinaigrette came to mind but to complement the roast taste, I roasted the garlic. The soft, delicately roasted garlic pretty much dissolves when you shake it like crazy with the rest of your dressing ingredients. Just be sure to not add any leftover chunks of garlic to the final salad.

This amount makes a great dinner for 2, or a side for 4.


Winter salad with roast garlic dressing
2 potatoes peeled and chopped into 3cm cubes
2 carrots chopped in half lengthwise, then into 2cm lengths
1 medium eggplant chopped into 4cm cubes
1/4 pumpkin chopped into cubes
1 capsicum cut into 3cm squares
1 leek thinly sliced
a chicken breast
a couple of handfuls of rocket leaves
2 garlic cloves unpeeled
olive oil
maldon (or other flaky) sea salt
oregano
paprika
dried garlic
red wine vinegar
maple syrup

Preheat your oven with a non-stick baking tray in it to 200 degrees.

In a large bowl, toss the potatoes, carrots, eggplant, pumpkin and capsicum with enough olive oil to lightly cover the veggies, a couple of pinches of salt, a few shakes of oregano and dried garlic. Pour onto the pre-heated tray and arrange in a single layer.

Bake for 30-40 minutes till everything is golden and well roasted.

Meanwhile, gently fry the leek in a little olive oil until caramalised and golden.

Butterfly the chicken breast so it is an even thickness. Dust with paprika, dried garlic and oregano then fry in a little olive oil until both sides are golden brown and the chicken is cooked through.

To make the dressing, pop the whole unpeeled garlic cloves on top of the other veg and roast for 10-15 minutes until just starting to ooze. Take them out of the oven and squeeze the garlic out of their cases into a jar. Top with 2-3 tablespoons of olive oil, 1-2 tablespoons red wine vinegar and a teaspoon of maple syrup. Screw the top of the jar tightly and shake like crazy. The garlic should disintegrate and make a lovely creamy dressing.

To serve, in a large bowl add the rocket, roast vegetables straight from the oven, leek and enough dressing to lightly dress the salad. Toss together, then top with slices of the chicken breast.

Sunday, July 26, 2015

Recipe: Beef and barley soup


It is mid-winter and I'm truly in nesting mode. It is the season for slow cooked braises and soups. The kind of things that bubble away on the stove all day, filling the house with rich, warm, delicious scents.

Soup has been a staple in our house for the last few months. But as the winter gets deeper and the days colder I want something with a bit more substance to keep me going. Warm and hearty is what I'm after and I just don't think that you can beat beef and barley soup for that.


There is nothing particularly revolutionary about my recipe, it is a collation of ideas with chili added but I love it and I thought you might too. This makes a reasonably large amount, but this soup freezes extremely well so it is a great one to make a big batch of for those cold days when you don't want to venture outside or to keep you going all week.

I don't own a slow cooker, so I do this recipe in my cast iron Le Creuset pot on the cook top. If you do have a slow cooker you could do everything from the point where you add the spices and stock in it, however the browning of the meat and veggies at the start is really important as that is where a lot of the flavour comes from. You will note there is quite a range of time frames.

This soup is best the longer you can cook it for but not every day allows for 8 hours of cooking, so you just cook it for as long as you can.


Beef and Barley Soup

800g-1kg chuck steak diced into 2cm cubes
Worcestershire sauce
3 stalks of celery diced
2 carrots diced
1 brown onion diced
2 bay leaves
2 sprigs of rosemary
2 dried chillies
4 cloves of garlic, peeled
approx 1 tsp thyme leaves
approx 2 tsp ground black pepper
1 litre beef stock
3/4 cup of pearl barley, rinsed and picked through
1 1/2 cups hot water
1/2 bunch kale shredded
2 tbsp chopped parsley

Heat a dutch oven or heavy based saucepan till hot. Add a couple of tablespoons of canola oil and a knob of butter and allow to melt and sizzle. Brown the steak in batches.

When the steak is all browned, add it all back to the pot along with any juices and a good helping of Worcestershire sauce. I use a couple of tablespoons worth but it is a strong flavour so you can start with less. It will all bubble up, cook over the high heat until all the liquid is gone, stirring to keep from sticking. At the end the meat should be dark brown and fragrant.

Add in the celery, carrots and onion and wilt down. Again you want to cook it until there is no liquid left from the veggies - approx 10-15 minutes.

Add in the bay leaves, rosemary, chillies, garlic, thyme and pepper and stir to combine before adding the stock. Bring to the boil, then cover and cook on a low heat for 3-5 hours.

Remove the chillies, bay leaves and rosemary stalks (the leaves will have fallen off), along with any large chunks of garlic left and add in the barley and water. Cover and continue to cook on a low heat for another 2-3 hours.

10 minutes before serving, turn the heat up to medium high and stir in the shredded kale and parsley. Allow to wilt and enjoy a big warm bowl with a crusty loaf of bread.

Tuesday, June 30, 2015

Recipe: Gluten Free Lemonies


Do you have a favourite flavour? Something that just the thought of gets your mouth watering and the mention of on a menu means you must choose it? I have several: vanilla, raspberry, hazelnut, cinnamon, dark chocolate. But if I had to pick a single one, it would be lemon. I love all citrus but lemon reigns supreme. I am that person who eats the lemon slices in my drink, or sucks on a lemon wedge making my mother laugh with my yellow lemon grin.

In recent weeks I've been on a lemon binge. Several of my colleagues have very productive trees so I've been bringing home bags of lemons from the office. S was a little worried how we would use them up but after I made lemon cordial, lemon bars and lemon and poppyseed drizzle cake in a single day he realised he had nothing to be concerned about.

Lemon Bars from http://www.eatliverun.com/big-sur-lemon-bars/
If all of that wasn't enough, whilst browsing the internet I discovered Averie Cook's Lemon Lemonies, a fantastic take on a blondie packed with lemon flavour and I couldn't wait to find an opportunity to make them. Luckily one popped up quite quickly but due to the participants required a gluten free version. The following recipe is largely true to the original but is gluten free and Aussie friendly.

I have found that simply substituting gluten free flour for plain does not give a good texture and is often a bit dry. Instead I use a mix of gluten free flour, rice flour and ground almonds that tastes great and gives a fantastic texture. These are definitely LEMONY, there is no mistaking the flavour but if you love lemon like I do, I'm sure you will love them.


Gluten Free Lemonies - adapted from Averie Cooks

Base
3/4 cup white chocolate chips
115g butter
2 extra large eggs (roughly 60g each)
3/4 cup sugar
1/4 cup lemon juice
3/4 cup gluten free flour
1/2 cup rice flour
1/2 cup ground almonds

Glaze
2 cups icing sugar
about 1/3 cup lemon juice
about 1 tablespoon lemon zest

Preheat oven to 180oC (170oC fan forced). Line a 20x20 cm baking pan with baking paper and grease any corners where the baking paper doesn’t quite meet.

Melt together the white chocolate and butter. I generally do this over a double boiler as it is very easy to overheat the white chocolate and cause it to seize but you can do it in very short bursts in the microwave, stirring thoroughly in between.

Allow to cool for a minute then whisk in the eggs one at a time, followed by the sugar and lemon juice, whisking till all is combined and light and fluffy.

Fold the gluten free flour, rice flour and ground almonds into the mixture until just combined, don't overmix.

Pour mix into the prepared pan, smoothing the top lightly.

Bake for 25 minutes, or until lightly golden and a toothpick inserted in the center comes out mostly clean, or with a few moist crumbs. Leave to rest for 10-15 minutes

Meanwhile whisk icing sugar and lemon juice until smooth. The glaze should be thick but pourable which might require slightly more juice.

Pour glaze over the lemonies while still warm and in their tin. It should self level but you may need to smooth it over to the edges. Sprinkle with lemon zest (I grated it directly over).

Leave in the pan for several hours, or even overnight if you can fit your pan in an airtight container, so that the glaze sets before cutting into bars.

According to the original recipe the bars will keep airtight at room temperature for up to 1 week, or in the freezer for up to 6 months but I doubt they will ever last that long, they are too delicious!

Sunday, April 26, 2015

Recipe: Kingston Cheesecake


If you spent your childhood in Australia, you will recall the excitement of the opening of a packet of Arnotts Assorted Creams. Everyone had their favourite, I was (and still am) very fond of a shortbread cream but my first pick was always a kingston.

A few years ago someone introduced me to the idea of a super kingston - formed by sandwiching two Anzac biscuits together with Nutella. It is pretty darn delicious and as I made a batch of Anzac biscuits this week I remembered it and it inspired me to create this cheesecake.


This isn't so much an invention as a combination of existing recipes. The base is a standard Anzac biscuit which I got from a Woman's Weekly cookbook and the Nutella cheesecake is a Valli Little recipe from the April Delicious Magazine. However I will take credit for combining them into one decedent dessert.

A couple of tips. To make getting your cheesecake out of the pan and off the baking paper easier, I put the base of the tin in upside down and rather than cutting the paper to size, do a square of paper (so the the edges stick out of the tin). You will need someone to give you a hand as you have to lift the base up a bit to get it to lock into place but it forms a flat base rather than the little dip.

When you take it out of the tin, you can then use the corners of the baking paper to lift the cake onto your serving plate, then you just roll the paper up underneath the cake and it comes out smoothly as shown in the picture. Hopefully that makes sense, let me know in the comments if it doesn't.


Finally, I got a great tip from the cream cheese packet that I've included in the recipe below which is to have a bowl of hot water in the base of the oven as you cook. It stops the crust from burning by keeping the oven a bit more moist.

Kingston Cheesecake

Base
1 cup rolled oats
1 cup plain flour
1 cup firmly packed brown sugar
1/2 cup desiccated coconut
125g butter
2 tablespoons golden syrup
1 tablespoon water
1/2 teaspoon bicarbonate of soda

Filling
1/2 cup caster sugar
2 tbs plain flour
500g cream cheese (at room temperature)
1 tsp vanilla extract
4 eggs
300ml thickened cream
200g Nutella


Preheat oven to 140oC. Grease a 23cm springform tin and line with baking paper.

Combine oats, flour, sugar and coconut in a large bowl.

Combine butter, golden syrup and water in a small saucepan, stir over a low heat until smooth, stir in bicarb soda.  Mix into the dry ingredients.

Press the mix evenly into the base of the tin and up the sides leaving about a 1cm gap to the top of the tin (it will puff up to the top of the tin as it bakes). Refrigerate for 30 minutes.

Using an electric mixer, beat sugar, flour and cream cheese for 3-4 minutes until smooth. Add the vanilla, eggs and cream and beat for 1-2 minutes or until combined. Add the Nutella and beat for 2-3 minutes until smooth.

Pour the mix into the tin, it should fill to near the top of the biscuit mix.

Place into the center of the oven and put a bowl of hot water on the bottom of the oven. Bake for 1 hour or until almost set in the centre. Turn off the oven and leave with the door slightly ajar for 2 hours or until cooled completely.

Refrigerate for at least 1 hour or preferably overnight.

Saturday, April 18, 2015

Recipe: Quince and Hazelnut Rolls


One of the many things I love about living in Canberra is our four seasons. Each one has its own feel, its own scent, its own tastes. To me, there is nothing quite like the distinct scent of a pot of poaching quince to make it feel like Autumn has arrived.

Quince are available for just a few weeks, so this year I've been super busy poaching up multiple pots and freezing them. I think they are rather magical in the way they go from hard, white unappitising lumps to tender, ruby red deliciousness after a few hours in the oven. Quince on porridge is one of my favourite breakfasts and this plan will have me enjoying them for months to come. But having such a bounty has also inspired me to make use of my quince in some baking.


These quince and hazelnut rolls are my take on the traditional American cinnamon roll with a bread base instead of puff pastry like a french scroll. In this case I've used a brioche type bread, sweet, dense and best of all you make it the night before, let it rest in the fridge overnight and just bung it in the oven in the morning. It means you can arrive at the office with a tray of fresh rolls looking like a champion or have a morning tea without stress or fuss.

A couple of notes, if you don't love cinnamon, you might want to halve the amount, these are definitely VERY cinnamony. The dough is very soft, so be gentle with it and use plenty of extra flour on the bench, your hands and roller when rolling it out. If your quince like mine live in the fridge in their poaching liquid, drain them well and dry them off as best you can with paper towel. Finally I've used vanilla paste in the glaze. It is awesome stuff but if you don't have it a teaspoon vanilla extract will give you the flavour.


Quince and Hazelnut Rolls

Dough
¼ cup warm water
3 teaspoons yeast
3 tablespoon sugar
½ cup warm milk
3 eggs lightly beaten
170g butter, melted
3 ½  + ½ cup plain flour

Filling
80g butter, softened almost to melting
1/3 cup brown sugar
¼ cup hazelnut meal
2 tablespoons ground cinnamon
About half a poached quince, drained and finely diced

Glaze
1 ½ cups icing sugar
3-4 tablespoons milk
½ teaspoon vanilla paste
50g hazelnuts, roasted, skins removed and roughly chopped

Combine warm water, yeast and sugar in a large mixer bowl and let sit for a few minutes or until frothy.

Add the warm milk, eggs and melted butter and mix until combined. Gradually mix in 3 ½ cups of flour until the dough comes together.  Sprinkle the remaining half cup of flour on the bench, add the dough and kneed into a smooth ball. Grease a large bowl and and place the dough in it. Cover the bowl with plastic wrap and let sit in a warm location for 1-2 hours or until the dough has doubled in size.

Mix the brown sugar, hazelnut meal and cinnamon together.

Lightly dust a surface with flour. Once the dough has doubled in size, punch it down and roll into a large rectangle (about 20x60cm). Spread the very soft butter evenly over the dough. Spread the brown sugar mix evenly over the butter leaving a 2cm boarder on one long edge and dot all over with the diced quince. Starting with the other long edge carefully roll the dough into a log, keeping it fairly tight as you go. When you reach the edge, pinch along the edge to seal.

Place the log seam side down, cut off the ends so that the roll is even and cut the log into 12 even slices. Place in a buttered 25x32cm (or similar) baking dish – they should fill the dish and be touching. Cover with plastic wrap and place in the fridge overnight.

The next morning, brush the tops with melted butter and bake at 180oC 25-30 minutes or until golden brown.

Meanwhile mix together the icing sugar, vanilla paste and milk a tablespoon at a time until it forms a thick but spoonable paste. Drizzle half the mix over the hot rolls, then sprinkle over the hazelnuts and drizzle the remaining mix over to glue them on.

Allow to cool in the dish and serve just warm or at room temperature.

Best on the day they are baked.

Saturday, April 11, 2015

Recipe: Armenian Cake

One of the great things about being an adult is earning money that you get to spend as you please. One of the downsides of being an adult is that you realise you need to spend said money on totally useful, unexciting things like bills. And you get excited about spending money on things that your child self would consider the most boring thing in the world.


A few months ago we spent the equivalent of a flight to Europe and back putting insulation in our ceiling. I was so excited I took pictures of the guys on the roof.

Before and After

This week I paid for my oven to be professionally cleaned. Again I took photos and told everyone around it. Even more mortifyingly adult, I keep finding myself wandering into the kitchen to gaze adoringly at it.

It is funny how your priorities change over time. As teenagers my friends and I used to always meet at Sportsgirl. These were the days before everyone had mobile phones so picking a popular shop meant we had plenty to look at while we waited for the one person who was inevitably late. Over time we moved our meeting place to Portmans and then to Cue. Then one day someone suggested we meet in the home-wares section of David Jones. I mark that as the tipping point. The day we all realised that as adults we would prefer to spend money kitting out our kitchens than our wardrobes.

These days I have a pretty fantastically equipped kitchen, although it is only lack of storage that stops me buying more. In fact to reach the square cake tin I use to make this recipe requires taking about 10 other things out of the cupboard first.

But onto the cake. After admiring my clean oven for awhile the urge to bake in it took over. This cake has been a favourite for many years. I love the crumbly base and the toasted almonds on top. And I really like that it cuts neatly into little squares that I don't feel too guilty at eating. I have no idea what makes it Armenian, this recipe has been a handwritten entry in my mother's cookbook for as long as I can remember so if anyone knows where it comes from let me know!


Armenian Cake

2 cups self-raising flour
1 cup desiccated coconut
2 cups brown sugar
125g butter
1 cup milk
½ teaspoon bicarbonate of soda
1 egg beaten
200g natural (unpolished) almonds

Pre-heat your oven to 170 degrees. Grease and line a 8" square cake tin.

Mix the dry ingredients together and rub in butter. Halve mixture and press ½ into the base of the cake tin.

Dissolve the bicarbonate of soda in the milk. Add it and the beaten egg to the remaining half of the dry ingredient mix and beat until well combined.

Gently pour on top of the dry ingredients already in the tin. Top with nuts - I tend to put them in neat rows but you can arrange as you like, just place them gently so that they don't sink too much.

Bake for 1 hour. The top will end up a dark golden brown colour.

Cool, cut into squares and enjoy!

Saturday, February 28, 2015

Recipe: Fresh Fruit Tart


If you don't know that much about Vietnam and its history, it might surprise you to find that it is full of bakeries selling delicious bread, cakes and pastries. However Vietnam was a French colony for around 100 years and it left them with an amazing legacy of baking. It is really no surprise that just about every shopping strip in Australia has a "Saigon Hot Bake" as a legacy of Vietnam war refugees.

During our recent trip to Vietnam we enjoyed plenty of this French influenced baking. From the amazing banh mi sandwiches, to all sorts of cakes and pastries. The Cargo Club where I discovered the delicious crispy pork belly salad also has a fantastic patisserie attached and we found ourselves there nearly every morning.

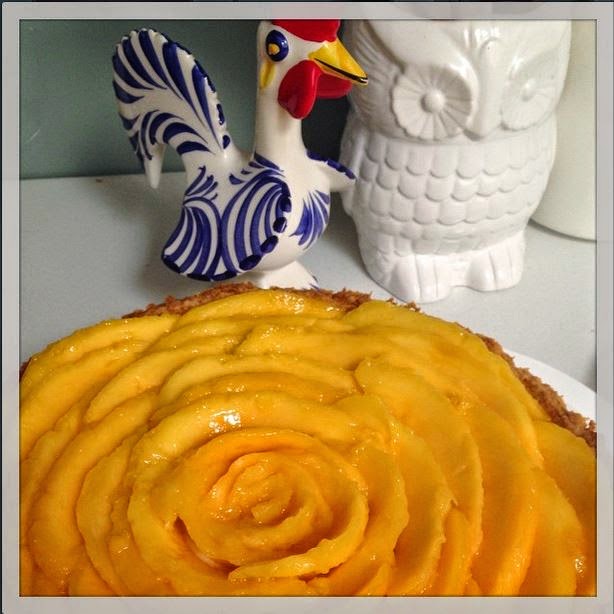
Everything we had was delicious, but S fell particularly in love with their mango tart. So much so that when it came time for him to request a birthday cake he asked me to recreate it. The Cargo Club version is small individual tarts which were a bit fussy for me, so I make it as one large tart. Mango is excellent on the tart, but you can use any fresh fruit. Most recently I've made it with plums and nectarines and the gorgeous raspberries that are in season right now would be particularly nice.

This is a reasonably complicated recipe and it takes time. You need to allow the pastry to rest, the creme patissiere to cool and assembling it prettily isn't quick. You could shortcut by making the pastry in a food processor, but personally I love hand-making pastry. I find the process of rubbing the butter into the flour and kneading the dough almost like meditating. So basically you will need to allow a couple of hours to make this, although a good chunk of that time is just letting things cool.

However the end result of that work is pretty spectacular looking and even better tasting!


Fresh Fruit Tart
Pastry
250g plain flour
150g unsalted butter, room temperature cut into cubes
2tbsp cater sugar
1 egg yolk
water

Creme Patissiere
600ml milk
1 vanilla bean, split lengthwise
6 egg yolks
125g caster sugar
60g corn flour

Topping
Fresh fruit of your choice

For the pastry case
Combine the flour, butter and caster sugar in a bowl and rub between your fingers till the butter is evenly distributed and the mixture resembles coarse breadcrumbs. Mix the egg yolk through and add the water, a tablespoon at a time till the mixture comes together. Kneed the pastry lightly on the bench till it is a smooth ball with no cracks. Shape into a disc, wrap in cling film and chill in the fridge for around 30 minutes.

Preheat the oven to 180oC, and grease fluted tart tin* with a loose base. Roll the pastry out between two sheets of baking paper till 2-3mm thick, then carefully line the tin and trim any excess. The pastry is quite soft so if it tears (or you put it in a bit lopsided like I often do) you can use the excess to patch any holes.

Line the pastry case with baking paper and fill with pastry weights. Bake for 15 minutes, then remove the baking paper and weights and bake for a further 10 minutes until golden brown. Remove from the oven and cool in the tin completely.

For the Creme Patissiere
Place 500ml milk and the vanilla pod (I like to scrape a few seeds out and put them in the milk too) in a saucepan and bring to the boil. Meanwhile whisk egg yolks and sugar together. Add the cornflour and remaining 100ml milk to the eggs and continue to whisk until combined.

Pour the hot milk into the egg mixture (remove the vanilla bean, you can use it to make vanilla sugar) and whisk to combine, then return this to a clean saucepan (just give it a quick wipe out with paper towel). Place back on a medium/high heat, whisking continuously. When pastry cream begins to bubble and thicken remove from heat and transfer back to the mixing bowl.  You need to watch it carefully, it will seem very runny for ages then all of a sudden will boil and thicken.

Cover with cling wrap with the wrap touching the creme patissiere to form a seal. Place in fridge and allow to cool (approx 1 hour).

To Assemble
Remove the pastry case from the tart tin and place on your serving dish. Fill with the creme patissiere (if it is completely cold give it a quick stir to loosen it up) and decorate with fresh fruit.

It is best on the day it is made but will keep in the fridge for a couple of days.

*Note: My tart tin is 25cm in diameter and 4cm deep. If you use a smaller tin, you may have excess creme patissiere. My recommendation is to not quite fill your pastry case to the top, leave a little gap to help hold the fruit in place.

Saturday, February 21, 2015

Recipe: Crispy pork belly salad with red curry dressing


Last year, S and I joined some friends for a holiday in Vietnam. It was my second visit and it left me even more in love with it and its stunning food.

We did our best to eat our way around the country, trying as many different things as we possibly could but there was one dish that was so tasty I insisted on returning to have for a second time before we left. Since we returned home I've been working hard to recreate it and I'm finally happy enough with this recipe to share it.

My inspiration was a salad of the same name at the Cargo Club in Hoi An. My version uses ingredients I could easily source in Australia and after much experimentation a dressing that while not the same, provides the same complimentary effect.

This is a fantastic dish for a relaxed meal with friends. You can prepare everything in advance and just do the final assembly when everyone is ready to eat.


Crispy pork belly salad with red curry dressing
Serves 4

500g pork belly, skin on, bones removed
olive oil
sea salt
1 carrot, julliened
1 cucumber, cut in half lengthsize, seeds removed, thinly sliced
½ red capsicum, thinly sliced
100g snowpeas, thinly sliced on the diagonal
150g bean shoots
½ bunch coriander, leaves picked
1 mango, sliced into thick julienne
1/4 iceberg lettuce torn into small pieces
fried shallot (the dried type you get in an Asian grocer)

Dressing
1/4 cup good quality red curry paste
1/4 cup coconut cream
2 tablespoons rice wine vinegar

Preheat oven to 180°C or 160°C fan-forced.

Score pork skin. Rub a few tablespoons of salt in and leave for 20-30 minutes. Wipe the skin dry with paper towel, then rub a little olive oil into the skin. Place pork, skin side down, in a large roasting pan lined with baking paper. Drizzle the meat with some more olive oil and season with a couple of pinches of salt. Bake for 1½ hours.

Turn pork, skin side up. Increase oven temperature to 220°C or 200°C fan. Bake for 45-50 minutes, until skin is crisp. Remove from oven and cover with foil. Rest  for 10-15 minutes.

Meanwhile, assemble the salad. Toss together the carrot, cucumber, capsicum, snow peas, bean shoots, coriander, mango and lettuce and divide between 4 bowls or plates. Drizzle with the dressing and top with the fried shallot.

Cut the pork into bite sized cubes and divide between the salads. It is easier to cut if you place it skin side down on your board.

For the dressing: heat the red curry paste in a small saucepan until fragrant and starting to split the oil out. Take off the heat, stir in the coconut cream and rice wine vinegar. If it is too spicy for you, you can add more coconut cream. The dressing is great warm but can be made a day ahead and stored in a sealed jar in the fridge

Tuesday, February 17, 2015

Recipe: Tomato and Basil Sausage Risotto


Have you seen this hilarious clip comparing cooking risotto by hand vs in a thermomix?

As funny as it is, it does highlight one of the BIG myths about risotto - that you have to keep constantly stirring! A few years ago I went to a great cooking class about risotto where I learned that not only is this unnecessary, it also breaks down the rice so you don't end up with the ideal consistency of fat, plump but individual grains of rice rather than a sort of porridge.

So what do you do instead? Well you do have to stir fairly regularly. Definitely when you add in liquid and every now and then to ensure it doesn't stick, but not all the time. So while it isn't the kind of meal you can leave there to look after by itself - unless you are lucky enough to have a thermomix - you don't to stand there constantly stirring. And yes you can leave it to go to the toilet!


But on to my risotto. I had been thinking of a sausage risotto when we walked into Aldi and saw their new range of gourmet sausages. With a garden full of tomato and basil, the veal, tomato and basil sausages stood out as the perfect base to me. If you don't have access to Aldi, any tomato based sausages would do. I also think it would be good with a spicy Italian sausage.

So give it a go and remember, just stir it enough to keep it from sticking!

Do you know any common food myths that make life that bit harder?

Tomato and basil sausage risotto
Serves 4 generously

Olive oil
1 medium brown onion finely diced
1 tsp chopped garlic
4 veal, tomato and basil sausages, casing removed
1.5 cups arborio rice
1 cup white wine
4-5 cups chicken stock
2 cups chopped ripe tomatoes
1 cup shredded basil
1/2 cup grated parmesan
pepper to taste

Heat the stock in a small saucepan till it is steaming but not boiling.

Heat the oil in a heavy bottomed pan over a medium-high heat and add the onion. When it is softened and lightly golden add the garlic and the sausages and break them up with your spoon into meatballish sized chunks. You want to get some really good colour on those sausages, that is flavour and your last chance before you add liquid.

When they are golden brown, add the rice and stir to coat with the oil and get the rice nice and hot. Turn the heat down to medium-low and add the wine. Give the base a good scrape to get any caramlised bits up. Add the tomatoes and start adding your hot stock, ladle by ladle.

It will take a good 30-40 minutes of low simmering, stirring as you add each ladle of stock and occasionally in between to stop it sticking. The final amount of stock required will depend on how juicy your tomatoes are. You will know it is ready when the rice is plump and doesn't have a chalky texture when you bite a grain, but each grain is still individually distinctive.

Once you reach that point, stir in your basil, parmesan and as much pepper as you like.

Serve with more pepper to taste!

Monday, August 25, 2014

Recipe: Chorizo and Kale Pasta


I've been on a bit of a kale journey recently. Yes, just as it was announced there is a world wide shortage of kale seeds, I've discovered this yummy veggie. Well I think it is yummy, I know the jury is out on this for a few of you, but I like it. This foray into cooking with kale has also coincided with a concerted plan to cook something new at least once a week, so several of my new recipes have featured kale.

I made this pasta out of what was left in the fridge and could be scavenged from the pantry. I made enough for dinner plus a leftover lunch, but S enjoyed it so much he had seconds and there were no leftovers! In his words it was something he could easily imagine having in a cafe - high praise for leftovers indeed.

The lemon and red wine vinegar give a real freshness to this dish, but are totally something to add to taste. I love vinegar so I put in quite a significant amount but add just as much as you would like.

Chorizo and Kale Pasta
olive oil
1 leek, white part only cut lengthwise then into strips
1 chorizo diced small
2-3 cargrilled capsicum cut in strips
3 cups kale leaves, cut off stem and torn into small pieces
lemon zest - roughly 1/4 large lemon, 1/2 small lemon
chili flakes to taste
1/2 cup grated parmesan
red wine vinegar
pasta of choice

Add a lug of olive oil to a hot frypan and cook down the leek and choritzo, until the leek is soft and caramlised and the chorizo is crispy. Add the capsicum, lemon zest and chili and stir to combine.

Meanwhile cook the pasta (I've done it with both spaghetti and pene) in a large pot of salted water. About 2 minutes before it is ready add the kale leaves.

Drain the cooked spaghetti and kale, return to the pan, add the chorizo mixture, the parmesan, a little more olive oil and red wine vinegar and toss to combine.

Sunday, July 20, 2014

Recipe: Cauliflower Soup


I pretty much eat everything. I'm not the hugest fan of pork, but I still eat it and have been enjoying it more recently. I don't love aniseed but then again I liked the fennel I cooked the other day. So pretty much, I will eat whatever arrives in front of me.

S on the other hand has a reasonable list of stuff he doesn't like. I consider food to be one of life's great pleasures, so I don't cook things he doesn't like which is simple except when it is stuff that I really do like. Seafood is easy - I eat it out. Mushrooms, well I sneak those in disguised under sauce or as a quick side for just me. But cauliflower, that one is hard.  You can't disguise cauliflower, it isn't really something you go out for and eating an entire head on my own is a tough ask. But when I have a cauliflower craving there is one way that I can use up head in a way that I find completely satisfying and that I don't have to subject S to - soup.

I think cauliflower soup is one of winter's great comfort foods. Thick, hearty and warming, it is the perfect lunch for a cold, grey day and we have had plenty of those recently. My version uses beef stock and herbs for a richer flavour that I find very satisfying. When I'm feeling flash I will pan fry some breadcrumbs and parsley in a little butter till golden brown and sizzling hot to top the soup with, but you know it is just as good, straight from the pot or as I mostly enjoy it, freshly heated from the microwave at my desk at work.

We are on a real soup kick at the moment. Which soups have you been enjoying?


Cauliflower Soup

olive oil
1 leek, white part thinly sliced
2 cloves of garlic diced
2 sticks of celery, diced
2 medium carrots, diced
head of cauliflower cut into florets
2 sprigs thyme
1 bay leaf
beef stock (about 4 cups)

Heat a tablespoon of olive oil in a large pot over a medium/high heat. Add the leek and saute until soft and fragrant. Add the garlic and cook for another few minutes until everything smells great but hasn't coloured too much.

Add in the celery and carrots, continue to saute for a few minutes till nice and hot then add the cauliflower, thyme, bay leaf and stock. Add as much extra water as you need until everything is just covered by liquid.

Bring to the boil, then simmer for around 30-40 minutes giving the occasional stir. When ready the cauliflower should be be soft enough to smush apart with a spoon. Remove the thyme and bay leaf.

Either allow to cool and blend in a normal blender or use a stick blender to blend the soup into thick, smooth puree.

Enjoy!

Wednesday, July 9, 2014

Recipe: Potato and Fennel Bake


Winter took some time to arrive this year, but now that it is here, boy is it here. Today started with a minus 5 degree morning, followed by a brief splash of sunshine before heading into the depths of icy cold rain.

All of this cold, grey, wet weather means one thing - it is time to hunker down with some full on comfort food. And what is more comforting than a lovely creamy potato bake?


As it transpired, I also had a random fennel in the fridge. Fennel isn't something that we regularly eat which was made especially obvious by S asking what it was. However we inherited one from my parents who were doing a fridge clean out so as I contemplated my potato bake I decided to incorporate the fennel.

The result was just yummy. Rich and creamy but with that lovely light aniseed tang of the fennel.  I think fennel may just be seen more regularly in our fridge!


What is your go to comfort food in this cold miserable weather?

Potato and Fennel Bake

potatos
fennel
cream
parmesan
salt and pepper

Allocate roughly  2 medium potatoes, a quarter of a fennel and 50ml cream per person - but make extra because you will want seconds!

Grease a baking dish thoroughly with butter.

Heat the cream a little to make it more runny - 30 seconds in the microwave will usually do it.

Thinly slice the potatoes and fennel (I use the thick side of my mandolin slicer). Layer one third of the potato, slightly overlaping to fill the base of the baking dish. Scatter with half the fennel, a generous amount of salt and pepper and a third of the cream.

Repeat another layer of potato, fennel, seasoning and cream then top with a final layer of potato and the last of the cream. Sprinkle over with a generous amount of freshly grated parmesan.

Bake at 170 degrees C covered for one hour, then uncovered for 20-30 minutes till lovely and golden.

Eat with, well just about anything, or potentially just a fork straight out of the dish. Mmmmm

Tuesday, February 25, 2014

Recipe: Panzanella


Each season has its own flavours and in summer we are particularly spoiled. Mangoes are for me sun in a skin. Peaches and cherries are Christmas. But summer, summer is sun warmed tomatoes and basil.

Each year I transform our tiny veggie patch into a tomato oasis, under planted with basil. And when it is full of sun warmed, perfectly ripe tomatoes I just love to make my version of the Italian bread salad, panzanella.

Traditionally panzanella is just bread, tomatoes and basil with a simple dressing. You use stale bread which you soak in water and squeeze out before making the salad. However, I like to add a few extra veggies and prefer my bread a bit more solid so skip the water step. I like to make this with a sourdough or Italian style bread. I recently made it with an olive sour dough and it was especially great.

This is not a traditional recipe but I think it is yummy. It goes really well with a simple steak or sausages, or just on its own.


Panzanella
(note I haven't included quantities because this recipe really is to taste. I try to have about equal amounts of bread to tomatoes) 

Day old bread
Tomatoes
Basil
Cucumber
Capsicum

Dressing:
Olive oil (roughly 2/3 to 1/3 vinegar)
Red wine vinegar
crushed garlic
sugar
salt and pepper

 Cut or tear the bread into roughly 1cm cubes. Cut up the tomatoes to an equal size and add to the bread (along with any juice that comes out when you cut them up). Roughly tear up the basil and cut up the cucumber and capsicum to similar size as the tomatoes. Drizzel with dressing and toss to combine.

To make the dressing combine all ingredients in a screwtop jar and shake.

This salad is best made at least 15-30 minutes before eating so that the flavours have time to meld.

Sunday, February 2, 2014

Recipe: Messing with a classic - creating a Summer Tiramisu


There are a heap of recipes that have stood the test of time, that have earned the status of "classic". They are flavours that are known and loved, so if you mess with them, you better be prepared for the fallout.

With the bounty of fresh berries at the moment, I wanted to make something that showcased them but that was also a bit of a decadent dessert. So I came up with the idea of playing with the flavours of tiramisu. I replaced the traditional coffee and chocolate - flavours that I think of more as for winter - with light citrus and berries.

The reaction was, well, mixed. Everyone really enjoyed it but with the thought of tiramisu in mind they were confused. I got a lot of "I like it but it isn't tiramisu" comments. Maybe I should call this a creamy berry pudding or something - if you can think of a better name let me know in the comments!

There is quite a bit of booze in this (plus raw egg so definitely not one for pregnant ladies), but the liqueur is all about the flavour. The recipe uses both orange and raspberry liqueurs, I used cointreau and an amazing raspberry nectar made by Centennial Vineyards in the Southern Highlands of NSW, but there are a heap of options out there. And the lemon syllabub has both wine and brandy in it, but trust me, I could eat it by the spoonful, it is just that delicious, and adds a fantastic tart element to offset the creamy richness of the mascarpone.


I have no idea how people take good photos of tiramisu, presentation wise, it looked as it always does like a bit of a mess when spooned out, but then again it getting a photo would have been tricky as it disappeared very fast. So I may have messed with a classic, and it may actually need a new name, but it would appear this was a success.

Have you played with any classic recipes recently? How successful was it?

Summer Tiramisu
Juice of one orange
3 tbsp cointreau (or other orange flavoured liqueur)
30 (ish) sponge-finger biscuits
3 eggs, separated
1/2 cup caster sugar
500g mascarpone cheese
3 tbsp raspberry liqueur
1/4 cup caster sugar, extra
1/3 cup thickened cream
mixed berries (I used a punnet each of raspberries, blueberries and strawberries)
lemon syllabub (recipe below)

Place the orange juice and cointreau in a shallow bowl.

Beat egg yolks and sugar until light and fluffy. Fold in the mascarpone and raspberry liqueur until just combined.

Beat egg whites and extra sugar until soft peaks form. Gently fold into the mascarpone mixture and then fold in the thickened cream.

Dip half of the biscuits into the orange juice mixture and place in the bottom of a 8-cup capacity rectangular dish. Spread half the mascarpone mixture over biscuits, then sprinkle over with half the berries. Repeat with the remaining biscuits and mascarpone mixture but reserve remaining berries. Cover and refrigerate overnight.

An hour or so before serving top with lemon syllabub and remaining berries.

Lemon Syllabub
1 lemon
brandy
1/3 cup caster sugar
1 1/4 cups cream
1/3 cup white wine

Thinly peel lemon. Place the peel and juice of the lemon in a measuring cup and add enough brandy to make half a cup. Cover and let stand overnight.

Strain the juice/brandy mix discarding the peel and any pith from the lemon, add the wine and sugar to the juice/brandy and stir till dissolved.

Beat cream till soft peaks form then very slowly beat in the lemon mixture. When the cream holds its shape spoon over the tiramisu.

Sunday, January 12, 2014

Eggplant, chickpea, quinoa and goats feta salad


In the warmer months I could quite happily live on salad. And to be frank I would be pretty much satisfied with a good old garden salad most days but variety is the spice of life and there are so many delicious salads it would be a shame to limit myself.

This one was inspired by seeing a picture of an eggplant salad on pinterest. That salad was completely different and I still intend to try it, but this salad turned out exactly as I wanted. I wanted something substantial that I could have as a work lunch, so it needed the protein and carbohydrate from the chickpeas and quinoa. I particularly love the flavour combination of goats cheese and eggplant but that can get a bit cloying so I added the parsley to freshen it up. And pine nuts - well every salad benefits from a few of these fragrant beauties.

I prefer to cook my chickpeas from dried, I think they have a better texture. But that does require a certain amount of pre-planning so canned is fine. And as with many of my recipes, the quantities are open to interpretation, if you like something more, there is nothing stopping you playing with the amount.

This salad was delicious warm but is also great cold. The flavours meld together beautifully.

What salads are you enjoying this summer?

Eggplant, Chickpea, Quinoa and Goats Feta Salad
2 medium eggplant cut into 2cm (approx) cubes
3 tbs olive oil
1.5 cups of cooked chickpeas (which is equal to about a can or 1/2 cup dried)
1/2 cup quinoa
1 cup parsley leaves picked
100g goats feta
100g pine nuts toasted

Dressing
3 tbs olive oil
1.5 tbs red wine vinegar
1 tsp honey
1/2 tsp minced garlic
salt and pepper

Lightly toss the eggplant in olive oil and bake at 180 degrees celcius until golden brown - about 20-30 minutes.

Rinse quinoa thoroughly then boil in about 2 cups of water for about 15 minutes. It is cooked when it becomes translucent and you can see the germ.

Cook chickpeas according to packet or can directions till tender.

In a large bowl combine the warm chickpeas, quinoa and eggplant with the parsley and toasted pine nuts. Crumble feta over, add the dressing and toss to combine.

Enjoy!

To make the dressing combine all ingredients in a jar and shake to combine.

Thursday, January 2, 2014

New Year and a recipe


Happy New Year! Have you recovered from New Year's Eve yet? After a late night and a fair bit of cocktail consumption we had a very quiet start to 2014. Even the day seemed a bit hungover, the sky was a pale grey, the air cooler, everything just that bit quieter.

The tradition with my group of friends is for a fancy dress party each year. The venue has changed over time but fancy dress continues and people make a HUGE effort. This year's theme was Fairytales so S and I went as Hansel and Gretel. We looked pretty awesome if I do say so myself, but there were amazing costumes from the frog prince, to Rapunzel, Little Red Riding Hood, the Beast, Alice and the Mad Hatter, a complete set of Peter Pan, Tinkerbell and Hook (Peter was taking being young to the extreme at 8 months) and so many more. As always I'm in awe of the effort my friends put in to such things.

As with many such parties, the invitation asked us to please bring a plate. I was tempted to make a gingerbread house but I doubted it would be eaten. I considered a basket of bread (you know to leave a trail home) but that would have involved leaving the house on NYE. So I went with my go to party snack, savoury pinwheels.

These pinwheels are so easy to make, take next to no time and I usually have all the ingredients on hand in the fridge, freezer and cupboard. Best of all they are really yummy. In fact the plate full of them disappeared within minutes of me setting it down.

All in all it has been a great start to 2014. I hope this year brings you joy, laughter and great happiness.


Savoury Pinwheels
makes about 24
2 sheets of puff pastry
sun-dried tomato pesto
3 rashers bacon - finely chopped
1 small onion - finely diced
Approx. 200g grated mozerella cheese
Approx. 20g grated parmesan cheese
olive oil spray

Heat oven to 200 degrees Celsius (fan forced)

Place the sheets of puff pastry, still on their protective plastic sheets, on the kitchen bench.

Spread all over with the sun-dried tomato pesto, leaving a 1cm border on one side. For two sheets I generally use about half a jar.

Sprinkle all over with the chopped bacon and onion and grated cheeses (you can use spring onion too which looks great with the colour contrast). Make sure you go right to the edges, just leaving the 1cm clear border on just one side. Lightly spray the clear border with olive oil.

Using the protective plastic sheet, roll up the pastry, ending with the clear side. The oil will help the pastry stick together. Try to roll it as tightly as possible and press the clear pastry boarder into the roll to secure it.

Use a sharp non-serrated knife to cut each roll into 1cm slices and place on a baking paper lined oven tray. you should get about 12 from each roll.  Leave a fair bit of space between them as they will puff up and out. They squish a bit when you cut them so just re-form them and put any filling that has fallen out on top.

Bake for 15-20 minutes till golden brown then cool on trays (if you can resist them!).

Sunday, December 8, 2013

Christmas Baking

There are many things I enjoy about Christmas but one of them is that it gives me so many opportunities to cook for others. Taking full advantage of the season, I spent much of this weekend baking up a storm for my colleagues.

After a couple of years working in very small offices, I now work in an office with about 30 staff. It is a fun and friendly place and people often bring in things they have made. Last week a delicious Christmas cake was demolished in about half a day and so I felt inspired to join in.  Tomorrow I will be taking my colleagues a platter of festive biscuits. They will be getting:

Lemon scented shortbread stars


Shortbread is just one of those great Christmas traditions. This is a traditional recipe, I just add quite a lot of lemon zest when creaming the butter and sugar together and sprinkle the stars with raw sugar before baking. In the past I've made little cellophane bags of these tied up with tinsel. It is just one of those perfect tastes of the season.

Gluten (and diary) free Gingerbread


I know a huge number of people with issues with gluten, so when I discovered this gluten free gingerbread recipe I had to give it a go. I added quite a bit more spice than the recipe asks for, probably twice as much ginger and half again as much cinnamon and nutmeg. I also made 1.5 the quantity but doubled the egg so it was a bit less crumbly. It isn't quite your traditional gingerbread but it is yummy and perfect if you or your crew have allergies.

Vanillekipferl


I've written about these hazelnut delights before. They almost didn't happen this year though, as ground hazelnuts, in fact hazelnuts full stop, seemed impossible to find. Luckily the 4th supermarket I tried (Coles if you want them) had them in stock and now I have a whole tray ready for the office. We will see how many we still have by tomorrow, they are very moorish!

Have you been enjoying Christmas treats in your office?

Saturday, July 27, 2013

Eggplant and Tomato Pasta Sauce Base


One of our favourite things to do on a Sunday is wander the local markets.  We skip lunch and instead snack from the many offerings out for tasting and stock up our pantry with handmade delights and super fresh produce.

It was on one of these trips that we tried the pasta sauce that inspired this recipe.  This eggplant and tomato pasta sauce is great on its own, but even better as a sauce base.  Perfect for hiding veggies if you have a fussy eater, it adds an amazing depth of flavour to any tomato based sauce.  It makes for a truly delicious bolognaise, a wonderful ratatouille, a fab lasagne - pretty much your imagination is the limit. An easy variation is just to add a handful of fresh herbs before serving.

And best of all it is super easy to make in bulk and store in the freezer to turn a quick meal into a super one.


Eggplant and Tomato Pasta Sauce Base
2 eggplant (aubergine)
1 large onion diced
2 cloves of garlic diced
1-2 680g jars passata (depending on how big your eggplant are and how runny you want your sauce)
1/2 cup red wine
Splash of red wine vinegar

Slice your eggplant lengthwise in half.  Lay them cut side up on a baking tray and spray or lightly brush with olive oil.  Bake at 150 degrees celcius for 1-2 hours until the skin is bubbled and leathery and the inside is soft.  The cut side will get a little brown but shouldn't get too dark.  The length of cooking will depend on the size of your eggplant.

When they are ready take them out of the oven and allow to cool for 10 or so minutes or until you can handle them.  Then scrape all the flesh out of the skin and discard the skin.

Meanwhile caramalise your diced onion in a heavy casserole.  You want it nice and golden.  Add the garlic and cook for a few minutes till fragrant.  Add in the eggplant, passata, red wine and vinegar, stir to combine.

Now blitz it with a stick blender.  You should end up with a very thick, creamy red sauce - ready to eat or add to your own pasta recipe.

Saturday, June 15, 2013

Spanish Inspired Warm Dip


When the weather gets cold in Canberra the parties don't stop, they just move inside and focus on warm canapes.  And for those occasions I turn to a delicious, warm Spanish inspired dip.  This is not a dip to have on a delicate wafer, it is a hearty, chunky topping for a lovely piece of sourdough bread.

I love this dip for so many reasons, not only is it warm and gently spiced, it is vegan, gluten free and most of the contents can be found in my pantry and fridge.  In fact if the parsley is growing in my garden (which disappointingly it is not this year) the only thing I have to buy is mushrooms and bread.

This is comfort food to share, which for me, makes it even more comforting.  What are your comfort food favourites for this time of year?


Spanish inspired warm dip

olive oil
2 onions sliced into 8ths
4 garlic cloves thinly sliced
small handful mushrooms thinly sliced
1tsp smoked paprika
1/2tsp cumin
1/2tsp hot chilli flakes
1/2 cup white wine
3 chargrilled capsicums, sliced in half lengthwise then in 1cm side strips
2 x 400g cans diced tomatoes
1 x 400g can chickpeas rinsed well
250g chopped frozen spinach thawed and excess moisture squeezed out
2 tsp red wine vinegar
1/2 bunch parsley chopped

Sour dough bread to serve

Add a splash of olive oil and onions to a large pan on a medium-high heat.  Cook, stirring regularly, until onions are softened and golden brown.  Add garlic and mushrooms and cook until mushrooms are softened.

Add paprika, cumin and chilli and cook till fragrant.  Add white wine, capsicum, tomatoes, chickpeas and spinach.  Stir to combine, lower heat and cook for about 20 minutes till thick and warm.

To finish, add red wine vinegar and parsley.

Serve with sliced sour dough bread while still warm.